Jigs

1221/1271 - PantographPRO™

Enjoy Expanded 2D Sign/Design Making Capabilities without the Limitations of Router Templates with the PantographPRO™.

$79.99

SKU: 1221/1271 Category:
View Replacement Parts
<< Back
PantographPRO™ - Replacement Parts

||| Details

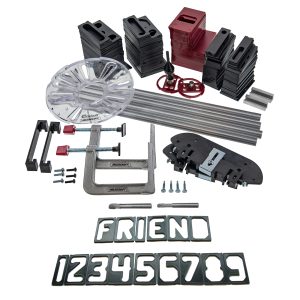
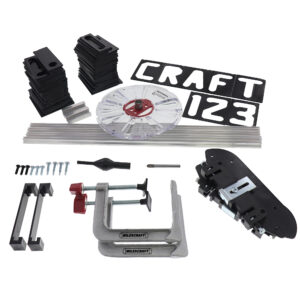
The Milescraft PantographPRO™ lets you expand your router’s capabilities with fingertip control. Quickly connect/disconnect your router through the TurnLock™ Base Plate. Anything you can print out, you can rout. The only Pantograph that comes mostly assembled right out of the box. This is a complete routing system; including 3 router bits, 3 stylus tips, 2 stencil fonts, and line drawings. All necessary hardware is included, all you need is your router and wood. Follow the design with your stylus and let the router do the work!

PantographPRO™ Features:

  • Trace along any letter stencil or line drawing, while your router makes the same cut at a 50% reduction
  • Easily controlled fingertip stylus
  • Attaches easily to most routers using the included TurnLock™ BasePlate Technology and hardware
  • Develop your own stencils using other sources such as a computer, coloring book or any other type of downloaded art
  • Minimal assembly required

TurnLock™ BasePlate

  • Clear base plate for visibility of work area
  • Tough polycarbonate base plate can be modified with a drill or file to fit nonstandard routers
  • Centering pin included for fast accurate base plate installation
  • Includes common mounting screws for attachment to most routers

Equipped With The Patented TurnLock™ Technology

  • Allows for fast tool-free guide bushing and router attachment exchanges
  • Thumb-activated lock/release mechanism enhances speed and safety when changing tools
  • The TurnLock™ base plate accepts all Milescraft® bushings

For more information on our universal base plate, see our compatibility chart and template.

 WARNING: Cancer and Reproductive Harm. For more information go to www.P65Warnings.ca.gov/product

  • Max. Board Width

    10"

  • Includes

    7" TurnLock™ BasePlate
    2 Font Stencil Sets and line drawings
    3 Router Bits
    3 Stylus Tips
    All necessary hardware

  • Router Bits

    1/4" V-Groove
    1/4" Straight
    3/8" Long Reach Core Box

  • Stylus Tips

    Large Head, Small Head, Pointed

  • Fonts

    Modern and Old English

  • Weight

    6.56 lbs

1221/1271 PantographPRO Manual (pdf)

Download >>

1221/1298 Product Comparison (pdf)

Download >>

Compatibility Page for TurnLock (pdf)

Download >>

Creating Stencils for Pantograph and PantographPRO (pdf)

Download >>

Pantograph Stencils (pdf)

Download >>
1221 PantographPRO from Milescraft
WATCH NOW >>
Average Review:
4.67 out of 5 based on 12 customer ratings

Join the Milescraft community and write a review for this product!

WRITE A REVIEW>>

Add a review

  1. 4 out of 5

    (verified owner)

    This is a very nice addition to my woodworking tools. I really enjoy the freedom to create the artwork.

  2. 5 out of 5

    (verified owner)

    I purchased this product after viewing an older review on YouTube. I found the directions on preparing the working surface and assembling the unit adequate. I was able to experiment with it this weekend and was surprised at the results on my test pieces. It certainly gives me more options than the sign making kit I had purchased from Milescraft in the past. I would definitely recommend this product to others. I was hoping to view a demonstration at one of the woodworking shows, but they are no longer available in the western states. A new tutorial with more detail in the use would be helpful either on the internet or by making a DVD available.

  3. 5 out of 5

    I love my PantographPro. I was looking through different CNC Machines but the prices were way out of my budget. The PantographPro was the perfect solution. I am able to route out logos, words and various different signs. It was pretty easy to set up and it’s very enjoyable to do. I’m definitely recommend it.

  4. 4 out of 5

    PantographPRO – 4 Stars out of 5
    This kit contains everything one need to make signs using router, except for the router and wood. In the box one will find a PantographPRO with all the necessary accessories to mount a router to it, three router bits with 1/4″ shank and templates with 2 types of font stencils. There is also a manual in the box and if that is not enough, one can watch a video about the assembly and use of this kit. The video is available on YouTube and the Milescraft website. There is not a DVD provided with this product. Assembly is quite easy and takes only few minutes. The whole jig needs to be mounted on a flat stiff surface, standard 3/4″ thick piece of plywood would be sufficient. The idea is simple: you move a stylus over a stencil of a letter or a drawing and the PantographPRO transfers that movement to the router, which makes exact copy in scale 1:2 (half the size of the stencil) in the wood (or some other material). The stencil is held in place by a transparent plastic sleeve and thumb tacks. Stylus is supposed to move just a little bit above the plastic without touching it. It was easier for me to be able to push the stylus on the stencil therefore I had to use many thumb tacks to hold it firmly in place, otherwise the sleeve would warp. Perhaps thin acrylic sheet would work better. It takes a bit of practice to produce nice signs. It is recommended to try the jig first on a scrap material to get a feel of it. One cannot make a whole word in one go. Letters have to be made one by one. That slows down the whole project. It is also a bit tricky to get the spacing between letters right, therefore there are spacing marks made on the templates. Following lines with a stylus is not that easy and takes some experience. However this jig is capable of producing very nice signs once you get the hang of it. Milescraft used adequate materials for this kit ensuring it’s long life, metal screws and good quality tough plastic. Good news for owners of other Milescraft’s jigs for routers, the included base plate features Milescraft’s TurnLock Technology. This base plate can be used with other Milescraft router accessories, such as the CircleGuideKit, SignPro or Design/InlayKit). PantographPRO is more versatile than a SignPro, as there are no limits to the fonts one wants to use. Anything can be printed or drawn on paper and copied on wood with this jig, whereas SignPro allows only the use of font provided. However, this jig is a little bit more difficult to use in my opinion. Also, one has to have in mind that template will be copied in half the size, therefore there may be a need to enlarge the stencils.

  5. 5 out of 5

    Easy to set up and easy to use. Clear and easy to follow instructions. Feels and looks like it is quality made. I Did a test piece using some of the stencils it came with, and some that I created and printed, and it all turned out great!

  6. 5 out of 5

    (verified owner)

    Great product use it all the time

  7. 5 out of 5

    (verified owner)

    Appears to work as advertised.

  8. 5 out of 5

    (verified owner)

    Jessica Randlall was most helpful, a few test and I was on my way to my first sign. Thanks, I wish other transactions could be as smooth as this was!

  9. 5 out of 5

    (verified owner)

    Ordered this for my husband for his birthday. He loves it! Took a but of time to make the jig for it. It works with his standard router but he’s planning to buy a trim router for it. Love it!

  10. 3 out of 5

    (verified owner)

    Instructions are not very good. pivot mounts are plastic

  11. 5 out of 5

    (verified owner)

    I ordered this as a birthday gift for my son, so I have no comment about it’s performance, however the information, ordering and shipping was nothing short of excellent. Thank you.

  12. 5 out of 5

    (verified owner)

    Glad I bought it. Just not as easy as I thought it would be, but I’ll master it soon enough.

What type of cuts do the different router bits make and what are they used for?

Round Nose Bit:
Single passes on stencil will create a round bottom cut. This works nicely with the Modern stencil set as well as many script/cursive fonts. Not recommended for situations where an even surface is desired at the bottom of a cut.

Flat End Bit:
Creates vertical side walls while cutting. Works well with the Old English stencil, creating protruded letters and in situations where an even surface is desired on the bottom of the cut.

V-Groove Bit:
Creates engravings with variable widths based on bit depth. When used at a shallow depth on a level board, it is ideal for detailed designs and line drawings. Also is effective at outlining letters.

Can I create my own stencils for the Pantograph?

It is possible to create your own stencils. This gives you the flexibility of different fonts and different sizes. Please visit the following link for more information on how to accomplish creating your own stencils. 

How do I use the centering pin to center the base plate on my router?

The Milescraft centering pin can be used to accurately align and center the TurnLock™ Base Plate. This is not an extremely tight fit as the centering happens from the convex area of the pin. The pin is two sizes, ¼” and ½”, based on the collet sizes.

  1. Remove the existing base from the router by removing the appropriate screws.
  2. Insert appropriate end of the centering pin into router collet. (Follow your router manufacturer’s instruction for this step.)
  3. Install provided TurnLock Bushing on to the Base Plate by twisting into the TurnLock opening in the center of the Base Plate. (Example: If the 1/4″ end is inserted into your router’s collet use the 5/8″ bushing on the 1/2″ end of the centering pin.)
  4. Place the BasePlate on top of the router so that the screw mounting recesses are facing away from the router.
  5. After lowering the Base Plate so it is in contact with the centering pin, rotate the Base Plate over the router’s threaded screw holes until the correct alignment is found.
  6. Loosely fasten the Base Plate to the router by reinstalling the same screws removed in step 1 or if necessary, the screws provided.
  7. Adjust the Base Plate as needed to center the TurnLock Bushing on the centering pin. (Note: This is not an extremely tight fit as the centering happens from the convex area of the pin.)
  8. When centered, secure the Base Plate into position by tightening the appropriate screws.
  9. Remove the TurnLock Bushing from the Base Plate by twisting it out of the TurnLock mechanism.
  10. Remove the centering pin from the router collet. (Follow your router manufacturer’s instruction for this step.)

Your TurnLock Router Base Plate is now installed and centered. To use, simply twist the desired bushing into place. Follow you router manufacturers’ guidelines for proper router operation.

Do I need special screws to attach the TurnLock™ BasePlate to my Ryobi Router?

Some Ryobi routers require special screws which will be supplied upon request at no charge to you. To acquire these special screws please contact Milescraft Customer Service via email,  info@milescraft.com or phone 224-227-6930.

How do I prevent the spread of sawdust when using my router?

If your router comes with a dust deflector, we recommend installing this before routing. It may also be helpful to install a dust collection adapter on your router, should this accessory be available for your particular brand/model number.

What do I use for the starting and finishing points for the Modern font?

Since these letters are cursive, the starting locations will vary based on the letters that precede them. Each lower case letter will be started based on the “starting point” that is specified unless they are preceded by a letter that is called out on that page. If that is the case, you will at the beginning of the dotted line near the asterisk.

Example:


What type of grease should I use on the Pantograph?

If the joints of the Pantograph are stiff, you may use a common lithium grease.

Is the Ryobi One+ compatible with the base plate?

Yes, the Ryobi One+ P601 is compatible with the #30681 TurnLock Base Plate. This Ryobi router does not require special screws.

Is my compact/palm/trim router compatible with the base plate?

Base plate compatibility chart and template.


Compatible Compact/Palm/Trim Routers:

Bosch/Colt PR20EVSPK
Bosch GFK125CE
DeWalt DCW600B
DeWalt DWE6000
DeWalt DWP611
Ridgid R2401
Ridgid R24012
Ridgid R86044B
Ridgid R860443B
Ryobi P601

Not compatible w/o plunge attachment:

Makita RT0700C (requires a plunge attachment for installation on the base plate)
Makita RT0701C (requires a plunge attachment for installation on the base plate)
Makita XTR01 (requires a plunge attachment for installation on the base plate)
Bosch/Colt PR20EVS (requires a plunge attachment for installation on the base plate)
Milwaukee 2723-20 (requires Milwaukee plunge attachment 48-10-5601, will align with slots I and E.).

Not compatible:

Porter Cable PC450
Bauer 19121E-B

How do I paint or finish my signs?

Painting or Finishing Signs – Helpful Hints:

Hint 1:

Spray paint the entire workpiece after it has been routed. After the paint is dry, sanding the entire sign with a belt sander will remove the paint from the high spots and leave paint in the areas that have been routed. Be sure to sand the workpiece evenly.

Hint 2:

Place Tuck Tape, or another sheathing tape, over the surface that you want to rout out. The router cuts through the tape and into the workpiece. After routing is complete, spray paint over the lettering, (usually two coats) and once dry, remove the tape. This can be done with the help of a shop knife or Exacto blade. This method cuts down on sanding.

How do I make signs that stand out?

  • If you are painting your sign, almost any wood species will do
  • For clear finished signs, laminate two contrasting wood species, such as padauk-on-maple (best for indoor use)
  • For outdoor signs, choose cedar, redwood, or white oak (these species resist rot)
  • After routing signs, use spray paint for a quick way to add contrast, plane or sand after the paint dries
  • Don’t apply a clear-film finish to outdoor signs; the sun’s ultraviolet rays will cause it to discolor and peel
  • Use pigmented deck finish or leave outdoor signs bare and allow it to weather naturally

What is the best way to set-up the Pantograph?

For instruction and material list, please see page 5 of the product manual for more information.

Milescraft PantographPRO Manual

Can I modify the base plate to fit my router?

In some instances, NOT ALL holes in the router’s base will match the mounting pattern. Only two diagonal holes matched to a router’s base are required (as a minimum) for proper installation and operation. You may decide to modify an existing slot or add hole(s) to better suit your router. The screws supplied may not fit your router. If you supply your own screws, DO NOT use “countersink” head styles.

Is my compact/palm/trim router compatible with the base plate?

Base plate compatibility chart and template.


Compatible Compact/Palm/Trim Routers:

Bosch/Colt PR20EVSPK
Bosch GFK125CE
DeWalt DCW600B
DeWalt DWE6000
DeWalt DWP611
Ridgid R2401
Ridgid R24012
Ridgid R86044B
Ridgid R860443B
Ryobi P601

Not compatible w/o plunge attachment:

Makita RT0700C (requires a plunge attachment for installation on the base plate)
Makita RT0701C (requires a plunge attachment for installation on the base plate)
Makita XTR01 (requires a plunge attachment for installation on the base plate)
Bosch/Colt PR20EVS (requires a plunge attachment for installation on the base plate)
Milwaukee 2723-20 (requires Milwaukee plunge attachment 48-10-5601, will align with slots I and E.).

Not compatible:

Porter Cable PC450
Bauer 19121E-B

Skip to content