Jigs

1206/1256 - SignCrafter™

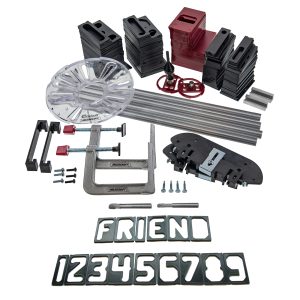
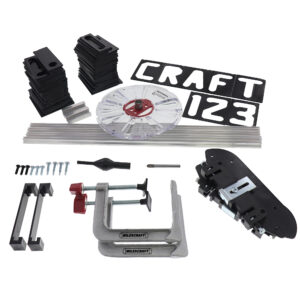
For professional looking router-cut wood signs, the Milescraft SignCrafter™ is the hobbyist’s tool of choice!

$64.99

SKU: 1206/1256 Category:
View Replacement Parts
<< Back
SignCrafter™ - Replacement Parts

||| Details

Create custom wood-engraved signs with the SignCrafter™. Self-spacing 2-1/2” horizontal characters fit into the 36” adjustable clamping system, without having to make any measurements. Affix the character templates and start routing, for uniformly spaced letters and numbers. With TurnLock™ as an integral feature on the BasePlate, bushing exchange is tool-free, hardware-free, and takes only seconds.

Guide Bushing

  • Durable 5/8″ guide bushing maintains consistent alignment with any router template
  • Bushing guides you through the templates to create great-looking signs
  • Metal nose guide bushing provides long-lasting durability

TurnLock™ BasePlate

  • 7″ TurnLock™ BasePlate fits most popular routers
  • Made of clear  polycarbonate for visibility of the work area
  • Can be modified with a drill or file to fit nonstandard routers
  • Allows you to change your bushing size quickly with no tools needed

Equipped with the patented TurnLock™ Technology

  • Fast tool-free guide bushing and router attachment exchanges
  • TurnLock™ base plate accepts all Milescraft bushings

SignCrafter™ Templates (82 pcs. total)

  • 2-1/2″ character templates included:
    •  A to Z plus one additional A, E, and I  (2 each)
    • 0 to 9 (2 each)
    •  period and quotation mark (2 each)

Low Profile C-Clamps

  • Securely hold the workpiece without obstructing the router
*Make sure that the bushing is installed on the BasePlate before routing

For more information on our universal base plate, see our compatibility chart and template.

 WARNING: Cancer and Reproductive Harm. For more information go to www.P65Warnings.ca.gov/product

  • Includes

    Two Sets of 2-1/2" Horizontal Templates (82 pcs. total)
    One - 3/8" Router Bit
    One - 5/8" Metal Nose Bushing
    Four - 18" Letter Rails with rail joiners
    Two - Support bridges
    Two - End Caps
    Two - Low Profile C-Clamps
    One - 7" TurnLock™ BasePlate with mounting screws
    One - 1/4" and 1/2" Centering Pin

  • Weight

    5.7 lbs

1206 SignCrafter Manual (pdf)

Download >>

1256B SignCrafter Manual – Metric (pdf)

Download >>
Milescraft 1206 SignCrafter with New TurnLock Baseplate
WATCH NOW >>
Average Review:
4.00 out of 5 based on 3 customer ratings

Join the Milescraft community and write a review for this product!

WRITE A REVIEW>>

Add a review

  1. 4 out of 5

    For really basic sign work, it’s good. It’s too bad there aren’t any other styles of lettering available for this kit.

  2. 5 out of 5

    (verified owner)

    Have not used it yet but everything is there and looks impressive.

  3. 3 out of 5

    I have had my Signcrafter kit for a few years now. It is fine so long as you limit your signs to using the single 18″ bars. The problem starts when you go to 36″ length. No matter where I put the “tightening slides ” the templets will work their way loose. On long signs I have to use extra clamps. Also it’s not that great on wood stock less than 4″ wide. It needs support under both side rails to make a decent cut. 4″ wide and 18″ long signs is pretty much what this is for. And yes…I have watched lots of YoiuTube on this.

Can I make my own templates for the SignCrafter™ & SignPRO™?

Milescraft does not make special character templates, however, you can create your own templates by purchasing material and cutting it out.

The material you will need to purchase is a polycarbonate material that is 3/32” thick x 4” wide and will need to be cut down to 3-1/4” to fit into the frame of the jig.

You will then need to draw or stencil the desired character onto the material and then cut it out. This will allow you to create a character to your desired height.

How do I create my own arrow template for the SignPRO™ or SignCrafter™?

You can create your own arrow template, by purchasing material from McMaster-Carr.

Please see the link below.

http://www.mcmaster.com/#1749k92/=w2dcid

The material is 3/32” thick x 4” wide.  It would need to be cut down to 3-1/4”  to fit into the frame.  You will need to draw or stencil an arrow onto the material and then cut it out, a jigsaw would work for this application. This will allow you to create an arrow to your desired length.

How do I use the centering pin to center the base plate on my router?

The Milescraft centering pin can be used to accurately align and center the TurnLock™ Base Plate. This is not an extremely tight fit as the centering happens from the convex area of the pin. The pin is two sizes, ¼” and ½”, based on the collet sizes.

  1. Remove the existing base from the router by removing the appropriate screws.
  2. Insert appropriate end of the centering pin into router collet. (Follow your router manufacturer’s instruction for this step.)
  3. Install provided TurnLock Bushing on to the Base Plate by twisting into the TurnLock opening in the center of the Base Plate. (Example: If the 1/4″ end is inserted into your router’s collet use the 5/8″ bushing on the 1/2″ end of the centering pin.)
  4. Place the BasePlate on top of the router so that the screw mounting recesses are facing away from the router.
  5. After lowering the Base Plate so it is in contact with the centering pin, rotate the Base Plate over the router’s threaded screw holes until the correct alignment is found.
  6. Loosely fasten the Base Plate to the router by reinstalling the same screws removed in step 1 or if necessary, the screws provided.
  7. Adjust the Base Plate as needed to center the TurnLock Bushing on the centering pin. (Note: This is not an extremely tight fit as the centering happens from the convex area of the pin.)
  8. When centered, secure the Base Plate into position by tightening the appropriate screws.
  9. Remove the TurnLock Bushing from the Base Plate by twisting it out of the TurnLock mechanism.
  10. Remove the centering pin from the router collet. (Follow your router manufacturer’s instruction for this step.)

Your TurnLock Router Base Plate is now installed and centered. To use, simply twist the desired bushing into place. Follow you router manufacturers’ guidelines for proper router operation.

Do you offer additional fonts for the SignCrafter and SignPro?

Unfortunately, we do not offer additional font templates at this time. However, there is a product that can do other sizes and fonts. It is called the PantographPRO.

A pantograph works from tracing a paper stencil (1 character at a time) rather than being guided directly by a group of templates, as with the SignPro or SignCrafter. This gives the user unlimited font capabilities.

Can I use the same guide bushing and router bit for both the 1-1/2" & 2-1/2" templates?

When routing signs using the 2-1/2″ templates, you will want to use the 3/8″ LR Router Bit with a 5/8″ Guide Bushing.

When routing signs using the 1-1/2″ templates, you will want to use the 1/4″ LR Router Bit with a 7/16″ Guide Bushing.

You can purchase a 1/2″ bit (#2213) and use this with the 2-1/2″ templates to create ‘bold’ letters.

For your convenience guide bushings and router bits can be purchased separately.

Does the bushing need to be installed on the BasePlate before I begin routing the work-piece using the SignCrafter or SignPro?

Please make sure that the bushing is installed on the TurnLock™ BasePlate before you begin routing your project. This will ensure that your router bit does not come in contact with your templates.

Do you offer rails for the SignCrafter & SignPro that are longer than 18"?

Rails can be custom cut to the desired length. Please contact Milescraft Customer Service by phone or email, and we would be happy to assist you with your custom rails.

How do I keep my letters from falling out of the rails?

It is recommended that you use a support bridge even with signs that are 18” or less. You may also find it beneficial to clamp down the support bridge to ensure that the letter templates do not come lose while you are routing.

Do you offer vertical letter templates?

Currently, Milescraft only makes vertical number templates that can be purchased as a set. The set includes 1-1/2″ and 2-1/2″ number templates.

While we do not manufacture vertical letters, there is a router forum that outlines a process on how to create your own set up to do this. With this modification, you will be able to create vertical signs.

Please visit the following link for more information: http://www.routerforums.com/sign-making/11165-vertical-sign-making-2.html

What type of cuts do the different router bits make and what are they used for?

Round Nose Bit:
Single passes on stencil will create a round bottom cut. This works nicely with the Modern stencil set as well as many script/cursive fonts. Not recommended for situations where an even surface is desired at the bottom of a cut.

Flat End Bit:
Creates vertical side walls while cutting. Works well with the Old English stencil, creating protruded letters and in situations where an even surface is desired on the bottom of the cut.

V-Groove Bit:
Creates engravings with variable widths based on bit depth. When used at a shallow depth on a level board, it is ideal for detailed designs and line drawings. Also is effective at outlining letters.

Do I need special screws to attach the TurnLock™ BasePlate to my Ryobi Router?

Some Ryobi routers require special screws which will be supplied upon request at no charge to you. To acquire these special screws please contact Milescraft Customer Service via email,  info@milescraft.com or phone 224-227-6930.

Do I have to use a plunge base router with the SignCrafter™ or SignPRO™?

It is not required to use a plunge base router with this kit. Below you will find information on using both types of routers so you can see the difference in operation.

If using a fixed base router:
Lower router bushing into letter opening. With bushing in contact with the inside of letter opening and router bit above wood (NOT TOUCHING), start router motor. Lower bit into the wood until router base is resting on both rails. The router bushing traces around the letter opening. When the letter is complete, turn the router off. When the motor stops, remove router. Proceed to engrave all letters in the template assembly.

If using a plunge router:

Lower router bushing into letter opening. With bushing in contact with the inside of letter opening and router bit above wood (NOT TOUCHING), start router motor. Lower bit into the wood. The router bushing traces around the letter opening. When the letter is complete, raise router bit. Stop the router motor. Proceed to engrave all letters in the template assembly.

How do I prevent the spread of sawdust when using my router?

If your router comes with a dust deflector, we recommend installing this before routing. It may also be helpful to install a dust collection adapter on your router, should this accessory be available for your particular brand/model number.

Is the Ryobi One+ compatible with the base plate?

Yes, the Ryobi One+ P601 is compatible with the #30681 TurnLock Base Plate. This Ryobi router does not require special screws.

Is my compact/palm/trim router compatible with the base plate?

Base plate compatibility chart and template.


Compatible Compact/Palm/Trim Routers:

Bosch/Colt PR20EVSPK
Bosch GFK125CE
DeWalt DCW600B
DeWalt DWE6000
DeWalt DWP611
Ridgid R2401
Ridgid R24012
Ridgid R86044B
Ridgid R860443B
Ryobi P601

Not compatible w/o plunge attachment:

Makita RT0700C (requires a plunge attachment for installation on the base plate)
Makita RT0701C (requires a plunge attachment for installation on the base plate)
Makita XTR01 (requires a plunge attachment for installation on the base plate)
Bosch/Colt PR20EVS (requires a plunge attachment for installation on the base plate)
Milwaukee 2723-20 (requires Milwaukee plunge attachment 48-10-5601, will align with slots C and G.).

Not compatible:

Porter Cable PC450
Bauer 19121E-B

How do I paint or finish my signs?

Painting or Finishing Signs – Helpful Hints:

Hint 1:

Spray paint the entire workpiece after it has been routed. After the paint is dry, sanding the entire sign with a belt sander will remove the paint from the high spots and leave paint in the areas that have been routed. Be sure to sand the workpiece evenly.

Hint 2:

Place Tuck Tape, or another sheathing tape, over the surface that you want to rout out. The router cuts through the tape and into the workpiece. After routing is complete, spray paint over the lettering, (usually two coats) and once dry, remove the tape. This can be done with the help of a shop knife or Exacto blade. This method cuts down on sanding.

Is it possible to plunge too deep with my router?

Be sure the router’s depth is set appropriately and the depth stop is being used, this will prevent damage to the router bushing.

To achieve the best results, make multiple passes in increments of 1/4″ – 5/16″ until you have reached the desired depth of cut.

What bits can I use for sign making?

  • 1/4″ and 3/8″ round nose bits are the standard sizes
  • 1/2″ round nose bit adds greater depth and width to the characters
  • V-groove bits create beveled sidewalls.
  • Straight bits leave perpendicular sidewalls that add shadows for more contrast

How do I rout characters with inner fields?

When routing letters and numbers with inner fields (A, B, D, O, P, Q, R, 6, 8, 9, and zero), hold the guide bushing tightly against the other perimeter of the template as you rout. Even a slight wandering off the template wall could result in a botched character. It is best to use a test piece first.

How do I make signs that stand out?

  • If you are painting your sign, almost any wood species will do
  • For clear finished signs, laminate two contrasting wood species, such as padauk-on-maple (best for indoor use)
  • For outdoor signs, choose cedar, redwood, or white oak (these species resist rot)
  • After routing signs, use spray paint for a quick way to add contrast, plane or sand after the paint dries
  • Don’t apply a clear-film finish to outdoor signs; the sun’s ultraviolet rays will cause it to discolor and peel
  • Use pigmented deck finish or leave outdoor signs bare and allow it to weather naturally

When routing the inside of open letters, it is possible to get a flat surface?

Yes. It is recommended to make a full pass with the core box bit along the inside edge of the letter template. Then switch to ½” router bit with a bottom-cutting flute to get a flat surface. Light sanding may still be needed.

Can I modify the base plate to fit my router?

In some instances, NOT ALL holes in the router’s base will match the mounting pattern. Only two diagonal holes matched to a router’s base are required (as a minimum) for proper installation and operation. You may decide to modify an existing slot or add hole(s) to better suit your router. The screws supplied may not fit your router. If you supply your own screws, DO NOT use “countersink” head styles.